Spike - Auth0 Next.js SDK
Overview
This guide demonstrates how to integrate Auth0 with any new or existing Next.js application using the Auth0 Next.js SDK.
Installation
Using yarn:
yarn add @auth0/nextjs-auth0
This library supports the following tooling versions:
Node.js: 12 LTS and newer LTS releases are supported. Next.js: >=10
Auth0 Configuration and .env generation
Firstly create a Regular Web Application in the Auth0 Dashboard. This should be named for the application you are going to integrate with. For example Alderaan or Hybris. Note that this cannot be created via Terraform.
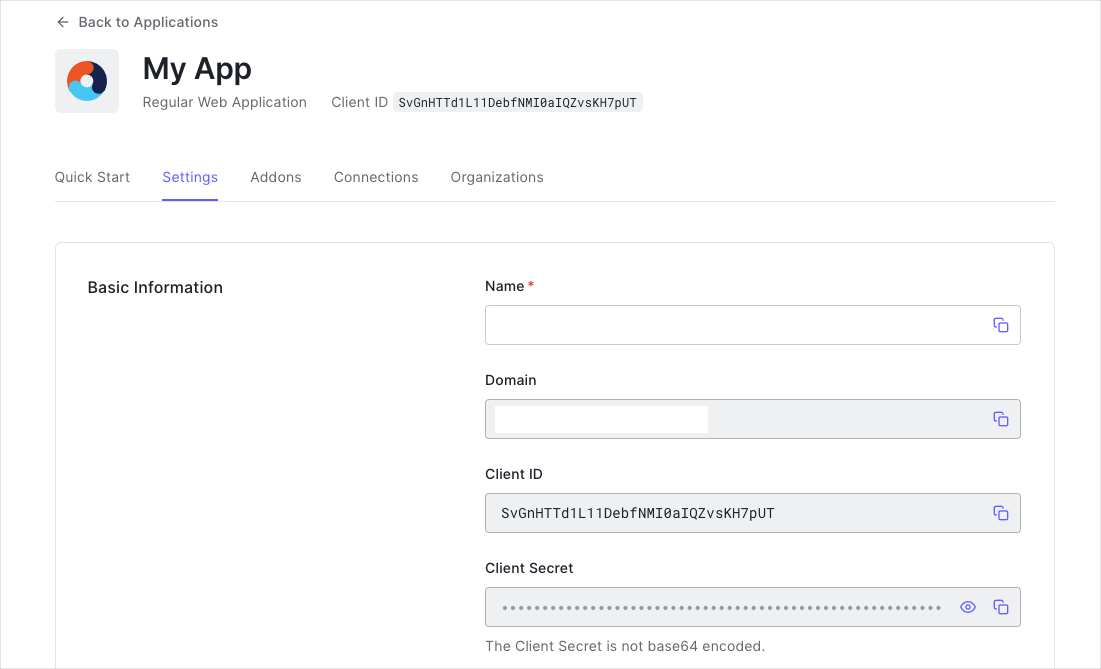
You need the following information:
- Domain
- Client ID
- Client Secret
Configure Callback URLs
A callback URL is a URL in your application where Auth0 redirects the user after they have authenticated. The callback URL for your app must be added to the Allowed Callback URLs field in your Application Settings. If this field is not set, users will be unable to log in to the application and will get an error.
If this is being tested locally the callback URL you need to add to the Allowed Callback URLs field is http://localhost:3000/api/auth/callback.
Configure Logout URLs
A logout URL is a URL in your application that Auth0 can return to after the user has been logged out of the authorization server. This is specified in the returnTo query parameter. The logout URL for your app must be added to the Allowed Logout URLs field in your Application Settings. If this field is not set, users will be unable to log out from the application and will get an error.
If this is being tested locally the logout URL you need to add to the Allowed Logout URLs field is http://localhost:3000.
Configure the SDK
In the root directory of your project, add the file .env.local with the following environment variables:
AUTH0_SECRET=''
AUTH0_BASE_URL=''
AUTH0_ISSUER_BASE_URL=''
AUTH0_CLIENT_ID=''
AUTH0_CLIENT_SECRET=''
AUTH0_SECRET: A long secret value used to encrypt the session cookie. You can generate a suitable string using openssl rand -hex 32 on the command line or node -e "console.log(crypto.randomBytes(32).toString('hex'))" in a node environment.
AUTH0_ISSUER_BASE_URL: The base URL of your application.
AUTH0_ISSUER_BASE_URL: The URL of your Auth0 tenant domain. If you are using a Custom Domain with Auth0, set this to the value of your Custom Domain instead of the value reflected in the "Settings" tab.
AUTH0_CLIENT_ID: Your Auth0 application's Client ID.
AUTH0_CLIENT_SECRET: Your Auth0 application's Client Secret.
Note: If we are deploying this to vercel then the env vars should be added there first as they can be downloaded onto your local device afterwards. Make sure not to prefix them with NEXT_PUBLIC_ as this will expose them to the browser.
If you've configured Development Environment Variables you can pull them into a .env.local for usage on your local machine using the following command:
vercel env pull .env.local
You can see a full list of Auth0 configuration options in the "Configuration Properties"" section of the "Module config" document.
Add the dynamic API route
Create an auth directory under the pages/api directory. Under this newly created auth directory, create a [...auth0].js file. The path to your catch all, dynamic API route handler should then be pages/api/auth/[...auth0].js.
Then, import in that file the handleAuth method from the SDK, and export the result of calling it.
Executing handleAuth() creates the following route handlers under the hood that perform different parts of the authentication flow:
/api/auth/login: Your Next.js application redirects users to your identity provider for them to log in (you can optionally pass a returnTo parameter to return to a custom relative URL after login, for example /api/auth/login?returnTo=/profile)./api/auth/callback: Your identity provider redirects users to this route after they successfully log in./api/auth/logout: Your Next.js application logs out the user./api/auth/me: You can fetch user profile information in JSON format.
It should be noted that at this point you are able to intercept each of the routes. The following example shows how to access the session that is returned in the callback.
import { handleAuth, handleCallback } from "@auth0/nextjs-auth0";

const afterCallback = async (req, res, session, state) => {
    console.log('aftercallback: session: ', session);
    return session;
}

export default handleAuth({
    async callback(req, res) {
        try {
            await handleCallback(req, res, { afterCallback });
        } catch (error) {
            res.status(error.status || 500).end(error.message);
        }
    }
});
Add the UserProvider component
The SDK uses React Context to manage the authentication state of your users. To make that state available to all your pages, you need to override the App component and wrap its inner component with a UserProvider.
Note This SDK is not compatible with the Next.js 13 app directory as this is still in beta. More details can be found here
import { UserProvider } from '@auth0/nextjs-auth0/client';
import type { AppProps } from 'next/app'

export default function App({ Component, pageProps }: AppProps) => (
  <UserProvider>
    <Component {...pageProps} />
  </UserProvider>
);
https://gitlab.com/rapharacing/rapha-front-end/poc/next-auth0/-/blob/master/pages/_app.tsx
Consume Authentication
You can now consume authentication. There are many ways to do this.
- Use the
useUser()client hook, which will get you the UserProfile object from the server-side session by fetching it from the HandleProfile API route.
import Link from 'next/link';
import { useUser } from '@auth0/nextjs-auth0/client';

export default function Profile() {
  const { user, error, isLoading } = useUser();

  if (isLoading) return <div>Loading...</div>;
  if (error) return <div>{error.message}</div>;
  if (!user) return <Link href="/api/auth/login"><a>Login</a></Link>;
  return <div>Hello {user.name}, <Link href="/api/auth/logout"><a>Logout</a></Link></div>;
}
- Use withPageAuthRequired server function. Wrap getServerSideProps with this method to make sure the user is authenticated before visiting the page. If the user visits a protected without a valid session, it will redirect the user to the login page. Then they will be returned to protected page after login.
import { withPageAuthRequired } from '@auth0/nextjs-auth0';

export default function Page() {
  return <div>Protected content</div>;
}

export const getServerSideProps = withPageAuthRequired();
- https://gitlab.com/rapharacing/rapha-front-end/poc/next-auth0/-/blob/master/pages/ssr.tsx
- Type alias WithPageAuthRequired
- Type alias WithPageAuthRequiredOptions
- Use withAPIAuthRequired for API routes. Wrap an API route to check that the user has a valid session. If they're not logged in the handler will return a 401 Unauthorized.
import { withApiAuthRequired, getSession } from '@auth0/nextjs-auth0';

export default withApiAuthRequired(function ProtectedRoute(req, res) {
  const session = getSession(req, res);
  ...
});
- Use withMiddlewareAuthRequired to protect pages with Next.js Middleware. We have the option to protect all pages or just specific routes.
// middleware.js - All Routes
import { withMiddlewareAuthRequired } from '@auth0/nextjs-auth0/edge';

export default withMiddlewareAuthRequired();
// middleware.js - My Account Routes
import { withMiddlewareAuthRequired } from '@auth0/nextjs-auth0/edge';

export default withMiddlewareAuthRequired();

export const config = {
  matcher: '/myaccount/:path*',
};
Regular Web Applications
Regular Web Apps are applications that uses primarily server side, page GET, POST, and cookies for maintaining state. This is in contrast with a Single-Page App which heavily relies on client side Javascript interacting with an API.
Because regular web apps are server-side apps where the source code is not publicly exposed, they can use the Authorization Code Flow (defined in OAuth 2.0 RFC 6749, section 4.1), which exchanges an Authorization Code for a token. Your app must be server-side because during this exchange, you must also pass along your application's Client Secret, which must always be kept secure, and you will have to store it in your client.
How it works
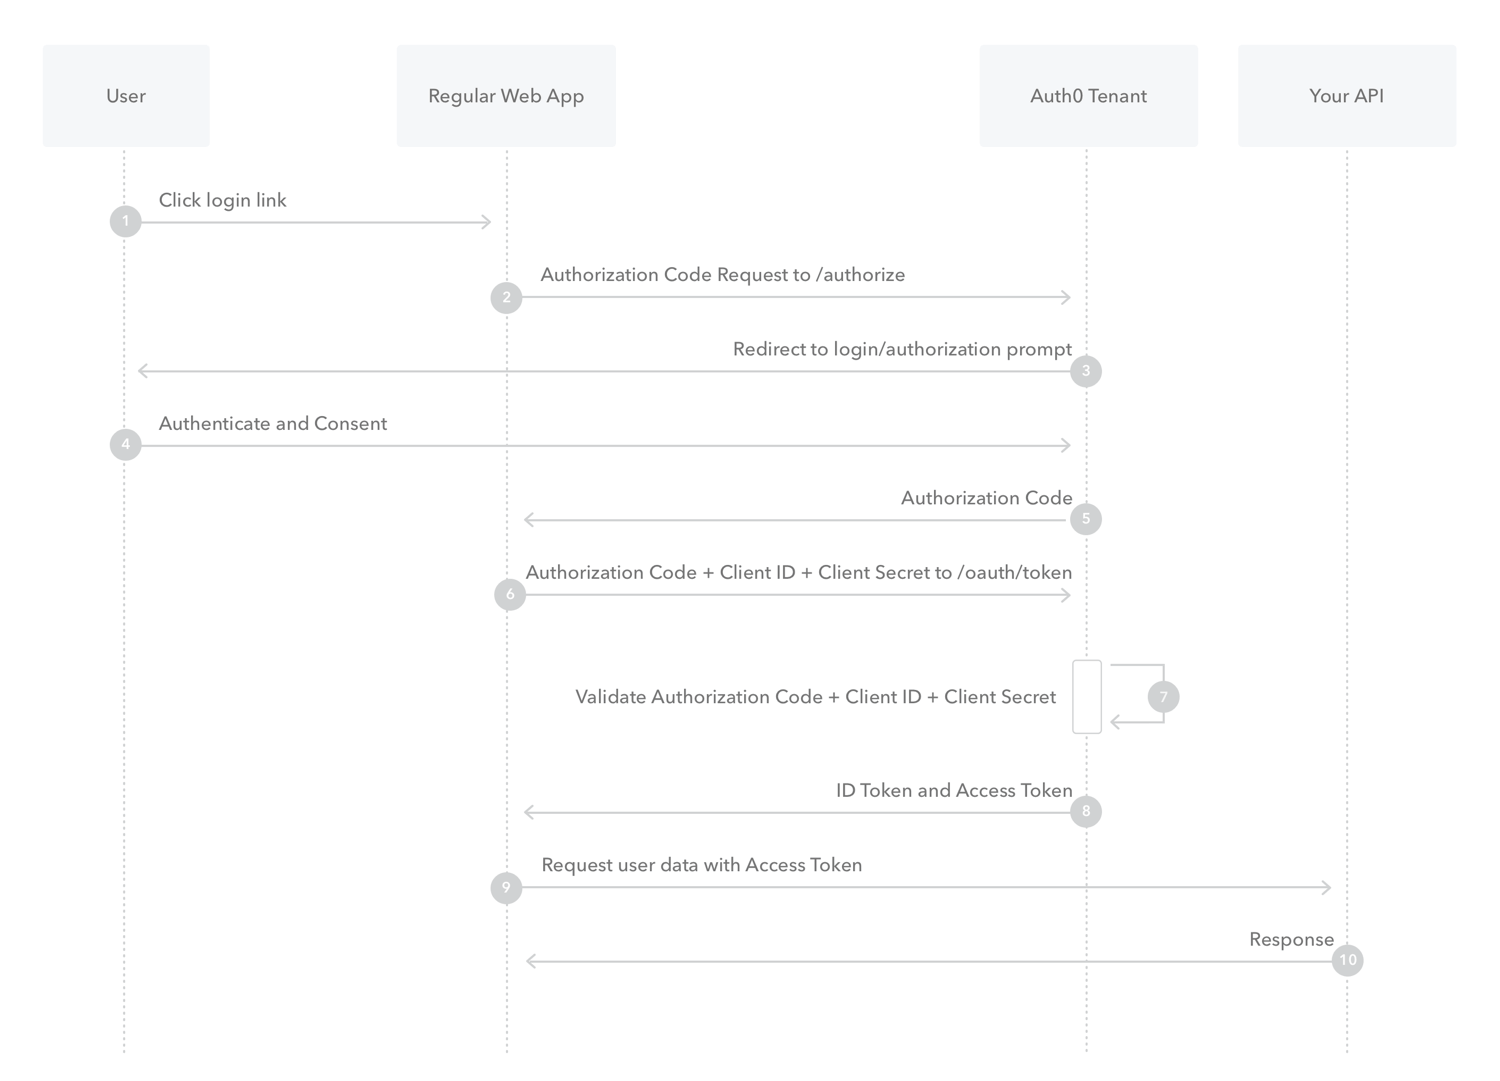
- The user clicks Login within the regular web application.
- Auth0's SDK redirects the user to the Auth0 Authorization Server (/authorize endpoint).
- Your Auth0 Authorization Server redirects the user to the login and authorization prompt.
- The user authenticates using one of the configured login options and may see a consent page listing the permissions Auth0 will give to the regular web application.
- Your Auth0 Authorization Server redirects the user back to the application with an authorization code, which is good for one use.
- Auth0's SDK sends this code to the Auth0 Authorization Server (/oauth/token endpoint) along with the application's Client ID and Client Secret.
- Your Auth0 Authorization Server verifies the code, Client ID, and Client Secret.
- Your Auth0 Authorization Server responds with an ID Token and Access Token (and optionally, a Refresh Token).
- Your application can use the Access Token to call an API to access information about the user.
- The API responds with requested data.
Cookies and Security
All cookies are set to HttpOnly, SameSite=Lax and are set to Secure if the application's AUTH0_BASE_URL is https.
The HttpOnly setting will make sure that client-side JavaScript is unable to access the cookie to reduce the attack surface of XSS attacks.